Problem
- How to enable a service to run in multiple environments without modification?
Solution
- Externalize all application configurations including the database credentials and network location. On startup, a service reads the configuration from an external source, e.g. OS environment variables, etc.

Why Do We Need This?
- In microservices architectures, systems are split into several services (microservices), each one usually running in a separate process. Each process can be deployed and scaled independently, and this means there may be many instances of the same microservice running at a certain time.
- Let’s say you want to modify the configuration for a microservice that has been replicated a hundred times (one hundred processes are running).
- If the configuration for this microservice is packaged with the microservice itself, you’ll have to redeploy each of the one hundred instances.
- This can result in some instances using the old configuration, and some using the new one, at some point. Moreover, sometimes microservices use external connections which, for example, require URLs, usernames, and passwords.
- If you want to update these settings, it would be useful to have this configuration shared across services.
How Does It Work?
How Does It Work?
- The externalized configuration works by keeping the configuration information in an external store, such as a database, file system, or environment variables. At startup, microservices load the configuration from the external store.
- Implementing a Configuration Server With Spring Cloud Config
What is Spring Cloud Config Server?
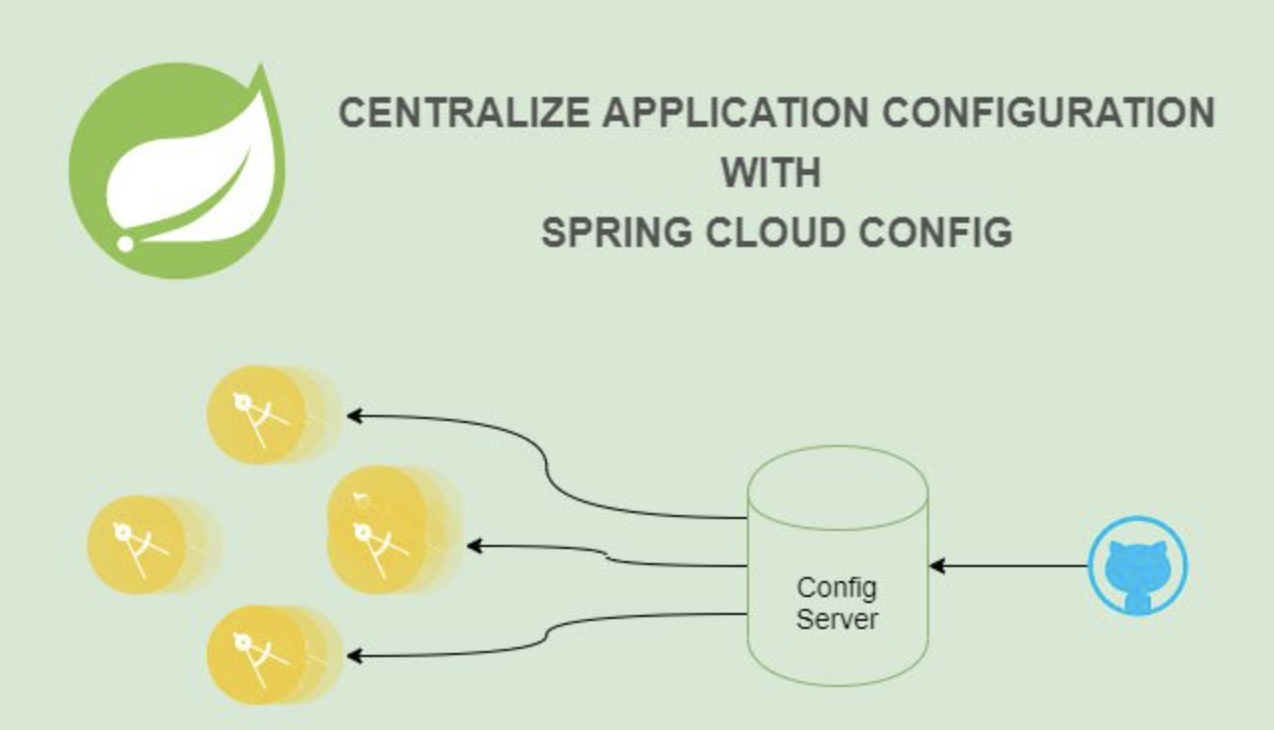
- Spring Cloud Config is a starter project to manage common configurations. It is integrated with Spring Boot and provided by Spring Cloud. When we create a Spring Boot Project and include the dependency of Spring Cloud Config in order to deal with configuration management, it acts as a dedicated Spring Cloud Config Server.
- In other words, it acts as a central configuration server that provides configurations (properties) to each microservice connected to it. Moreover, it significantly simplifies the management of many microservices by centralizing their configuration in one location.
- Also, it provides the ability to refresh the configuration of a microservice without redeploying the configuration changes.
- We apply @EnableConfigServer annotation at the main class of the Application to recognize that this application will act as a Spring Cloud Config Server.
What is Spring Cloud Config Client?
- Although, Spring Cloud Config Server is a popular term among microservices developers. On the other hand, we also have Spring Cloud Config Client which utilizes the services provided by Spring Cloud Config Server.
- Technically, these are microservices or Spring Boot Applications that take immediate advantage of the Spring Cloud Config Server. In order to connect with Config Server, we provide the entry of Config Server in the application.properties file of Config Client.
How To Implement Spring Cloud Config Server ?
How To Implement Spring Cloud Config Server ?
We will create below 3 Microservices
- Create a Repository in GitHub
- Eureka Server MS
- Config Server MS
- Config Client MS
1. Create a Repository in GitHub
- Register and Login to GitHub
- Create a new repository e.g. spring_cloud_config_repo
- Create one file name e.g. application.properties. Enter some property in the form of key-value pair. For Example: my.app.name=cloudtechtwitter.
- Finally, commit the changes.
- CopyURL:https://github.com/username/spring_cloud_config_repo.git, username and password. We will require URL, username & password when we create the config server at the later stage in this article.
2. Eureka Server MS
Step1: Create a Spring Boot Project
- Use the Spring Initializr to create a new Spring Boot application named Eureka-Server and include the Eureka Server, Actuator (optional), and Config Server dependencies:

Step2: Add Annotation @EnableEurekaServer at the main class
Step3: Update below property in application.properties file
3. Config Server MS
Step1: Create a Spring Boot Project
- Use the Spring Initializr to create a new Spring Boot application named config-server and include the Spring-cloud-config-server, Actuator (optional), and Config Server dependencies.

Step2: Add Annotation @EnableEurekaServer at the main class
Step3: Update below property in application.properties file
4. Config Client MS
Step1: Create a Spring Boot Project
- Use the Spring Initializr to create a new Spring Boot application named config-client and include the Eureka Discovery Client, Actuator (optional), and Config Server dependencies.

Step2: Add Annotation @EnableEurekaServer at the main class
Step3: Update below property in application.properties file
Step4:Create a RestContoller
class as CustomerRestController.java
How to test this Application?
- 1) Start Service/Application containing Eureka Server
- 2) Start Application containing Config Server
- 3) Start Application containing Product Service
- 4) Open a browser window, hit below URLs and observe the results.
- http://localhost:9950/customer/data
- Ouutput will be cloudtechtwitter
Note
- If you are getting configuration properties values from Github repository, it means you are getting correct values and your implementation is also correct.
- if same key is present at microservice configuration file and Config Server In that case, Config Server takes the higher priority.
How application holds the properties, which are read from an external property source like git?
How application holds the properties, which are read from an external property source like git?
- A Spring application holds the properties, which are read from an external property source such as a properties file or a config server, in PropertySource abstractions, and serves these properties to the beans of the Spring Application Context via the Environment interface.

- As you see in the diagram above when the Spring Boot Config Client application starts up, it fetches the remote property sources from the config server in precedence we looked over in the previous article and put them higher on the property source list.
- Higher in this list means higher in precedence. Actually there are more property sources than in the diagram but to be shown here, the ones coming from the bootstrap context generally have priority over the ones from local property files.
- Just after this refreshment of property sources, the next step is wiring these properties to the Spring beans and this happens when the beans are instantiated. This can happen via @Value or @ConfigurationProperties annotations.
How can we get updated values from Config Server to microservices without restarting the application?
How can we get updated values from Config Server to microservices without restarting the application?
- When it comes to refreshing the properties in the application context, there are two steps again; reloading the property sources in the Environment and refreshing the attributes of Spring beans.
- In the case of using Spring Cloud Config Server; Spring Cloud offers the following methods to refresh the properties in config clients.
- 1. By calling the /actuator/refresh
- Endpoint exposed on the config client via the Spring Actuator.
- 2. By calling the /actuator/bus-refresh
- endpoint exposed on the config client integrated with Spring Cloud Bus.
- 3. By calling the /monitor
- endpoint exposed on the config server integrated with Spring Cloud Bus.
1. Calling The /actuator/refresh Endpoint
- Let’s look over the following diagram to understand this type of refresh process

We need to upddate CustomerRestController.java file by adding @RefreshScope annotation as below
- import org.springframework.beans.factory.annotation.Value; import org.springframework.http.ResponseEntity; import org.springframework.web.bind.annotation.GetMapping; import org.springframework.web.bind.annotation.RequestMapping; import org.springframework.web.bind.annotation.RestController; @RestController @RequestMapping("/customer") @RefreshScope public class CustomerRestController { @Value("${app.name}") private String name; @GetMapping("/data") public ResponseEntity<String> getCustomerName() { return new ResponseEntity<String>("Customer Name is from Config Server: "+name, HttpStatus.OK); } }
- Think that we have committed a change in a property file in the git repository, say it is my-app.properties and we want to reflect this change to our application.
- So we make a rest call to the /actuator/refresh endpoint exposed by the config client application.
- With this call, the RefreshEndpoint in the config client prepares the config server url as mentioned in the previous article, and makes a call to the config server to fetch the most recent version of the properties.
- With the up-to-date properties, the property sources in the Environment are refreshed and the bean attributes are refreshed also if the bean has the annotation @RefreshScope.
- Just after that, an event named EnvironmentChangeEvent is thrown and the listeners of it can handle the effect of this change if it’s needed.
- Just after the reloading of property sources by calling the /actuator/refresh endpoint, the attributes bounded with @Value in the beans having the annotation @RefreshScope is refreshed.
- The property bindings made with the @ConfigurationProperties annotation do not need @RefreshScope annotation to be refreshed.
2. calling the /actuator/bus-refresh
- Spring Cloud Bus enables broadcasting the state changes among the services over a message broker like Kafka or RabbitMQ.
- So in our scenario, each config client reading from the same config server can communicate over a message broker and refresh themselves in case of configuration changes. That means we do not need to make a refresh request for each config client application instead, we just broadcast a message to the services over Spring Cloud Bus to refresh themselves.
- Let’s look over the following diagram:

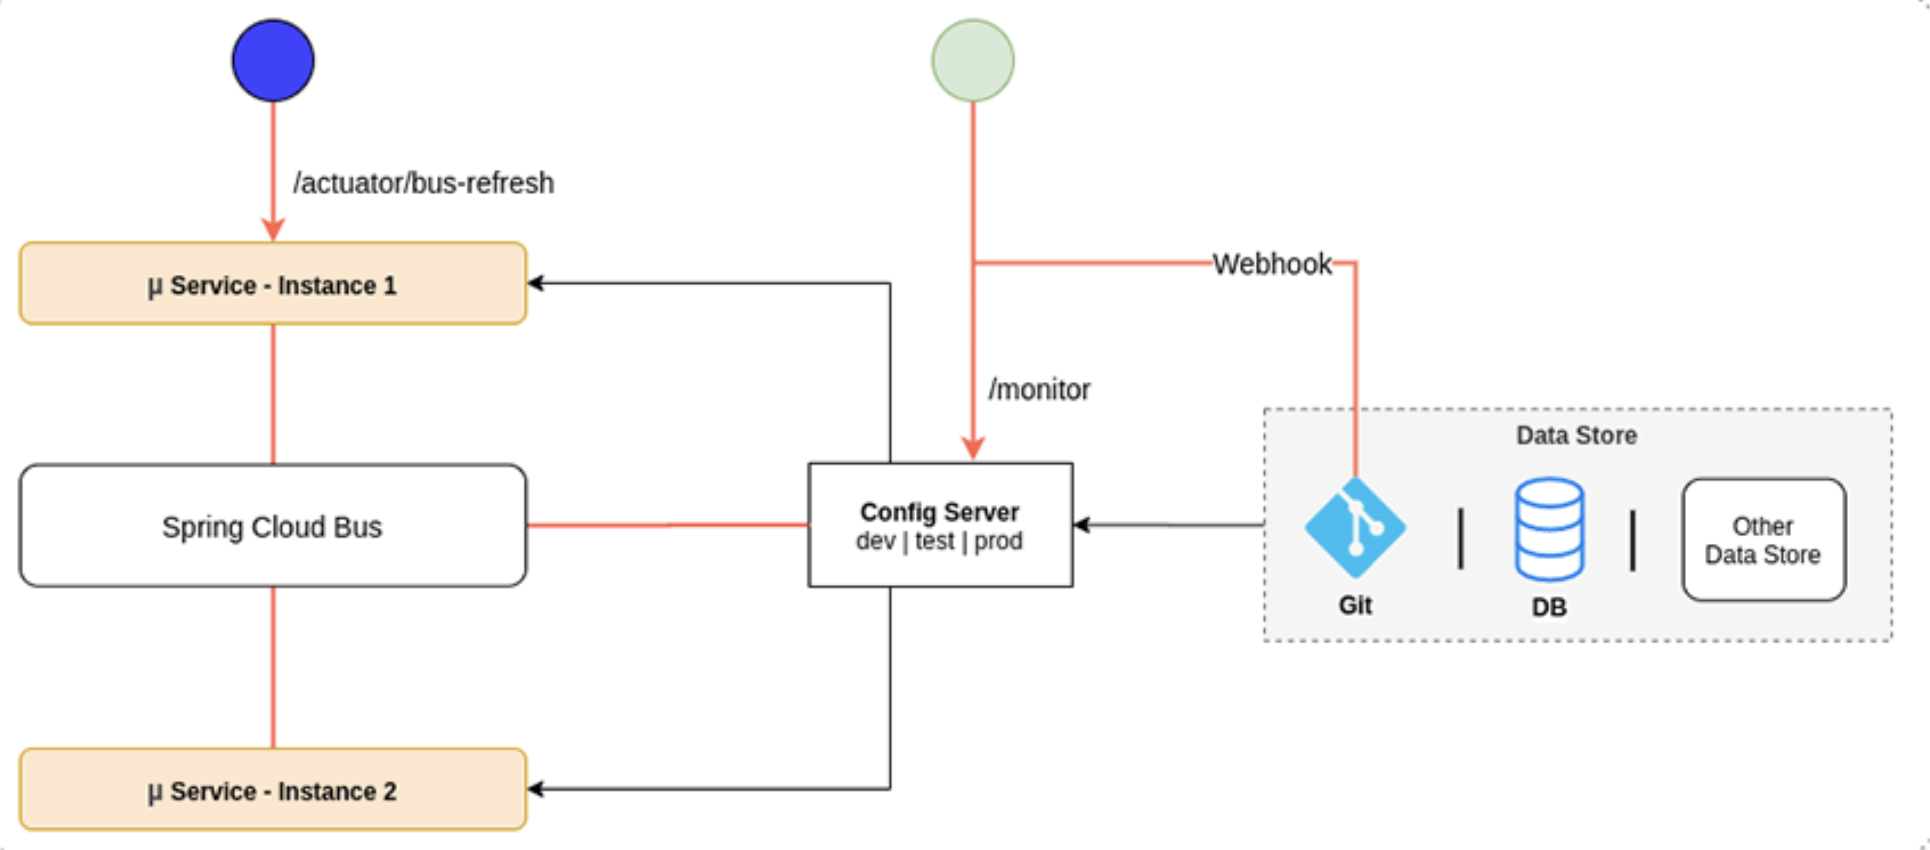
- The refresh process can be triggered by calling the actuator endpoint /actuator/bus-refresh exposed on a config client instance or, by calling the /monitor endpoint exposed on the config server.
- In each case, a state change message is broadcasted to the services over the message broker configured via Spring Cloud Bus and then each service makes a request to the config server with the config server url to refresh themselves.
- The /monitor endpoint is designed for git cloud solutions, like Github, to make push notifications using git webhooks. However, one can manually trigger a refresh event by making a POST request to this endpoint.
3. By calling the /monitor
- Another endpoint to refresh the configuration data via Spring Cloud Bus is /monitor endpoint.
- It’s exposed on the config server by the module spring-cloud-config-monitor.
- It’s mainly designed for triggering with git webhooks and supports the git cloud solutions like Github and Bitbucket.
- You can also call this endpoint to trigger a refresh event.
Other Reference Links:
- Microservice Design Pattern:
- Spring-Boot:
- Spring-Framework:
- Microservice:


